or

"Hey, I can do that!"


Monday, February 28, 2011

That Takes The Cake 2011 Preview

That Takes The Cake 2011 Preview


Folks, it's been a loooooong weekend for me and hubby.  I've got a lot to say about how awesome "That Takes The Cake" 2011 was, but my arms are too tired to keep going tonight.  Here's some stuff to look at though!

My cake pics:


Winners Slideshow:

Tuesday, February 22, 2011

Competition Work Log: Special Techniques

Competition Work Log: Special Techniques

For the longest time I had not decided what I would do for this category.  I think I decided some time last week.  It's coming along great though!

02/20/11: Hubby and I were re-organizing the den so we could put in my new computer desk.  In doing so we sacrificed a small shelf that held our router and wireless modem to my cake cause.  The shelf inserts were 10"x10" squares that was a perfect base for my model.  I screwed in 2 screws and attached a wire frame (wire coat hanger) to them.  With a generous helping of hot glue, the wire frame was going no where.  I made some rice krispie treats to make the majority of my model's bulk.  Turns out the wire stuck out too far on the top.  We didn't have any appropriate wire cutters so I was at a loss how to reconcile that.  Hubby said I could try the branch cutters and it worked great!  After the bulk was attacked, I covered it with goopy royal icing and let it harden over night. ~ 2 hours.

01/21/11: In a way, I now think modeling chocolate is easier to work with than clay.  I don't have to do any moisture control, just temperature management.  I put a layer of modeling chocolate over my model and sculpted out his features and musculature.  It was fun!  I have a plastic model that I used for reference, but I tried to not make it an exact copy.  I'm letting him "dry" overnight and hopefully painting him will go well.  ~ 3 hours.

01/22/11:  Painting did not go well at first.  I learned the hard way that modeling chocolate and food coloring don't like each other.  I don't know how, but I got some magical combination of gel coloring, Wilton White White, airbrush coloring liquid, and food coloring powder to all play nice and made some sort of opaque paint.  I doubt I'll ever be able to reproduce this!  Next time I'm investing in come cocoa butter colorings.  ~ 2 hours.

01/24/11:  I finished my model's accessories and the board.  Extruding and working with thin ropes of modeling chocolate is very tricky!  You can't handle it for very long or it starts to soften from the heat of your fingers.  I had several ropes threaten to melt as I was trying to place them around my model.  For the board, at first I was going to grind some rice and press it into buttercream on the surface to simulate rocky earth, but it turned out just rough buttercream that was slightly tinted looked great!  Saved me lots of time.  It's all done!  ~ 2 hours.

Thursday, February 17, 2011

Competition Work Log: Buttercream Only

Competition Work Log: Buttercream Only

Gah, no wonder no one enters this category!  This is HARD!  Today is my 3rd attempt at this entry.  The first idea I had seemed really cool and unique.  I started trying out some sort of sculpted, pleated fabric look using a combination of freezing piped fondant and pouring "steamed" fondant over it.  Dismal failure.  It just looked like ugly zig-zag piping.  2nd attempt was to do some stenciling.  Yet another dismal failure.  The stencil kept sticking to the base buttercream.  My 3rd attempt is in the works ... it's a pretty extensive frozen buttercream transfer.  I have no idea how it looks at the moment (since it's upside-down).  I'm scared to continue ... what if I do all the other work for the cake, but then the transfer stinks???

What kinda stinks is that all I have to do is enter and I'll probably place!  Last year there were only 2 cakes in the Adult Intermediate division for buttercream-only.  All I have to do is something and I can't seem to get anything going for me!

02/16/11: Completely dismissed 2 attempts after utter failure. ~5 hours.
02/17/11: Completed most of the frozen buttercream transfer.  Hope it's ok! ~4 hours.
02/17/11 (update): Done!  The frozen buttercream transfer looked great!  The only problem was either the parchment paper underneath either got most or the buttercream contracted it ... because it wrinkled in one spot.  I tried to build up more icing on top once I saw that, but it's not perfect.  Next time I'll invest in some food-grade acetate to pipe on to. ~2 hours.

Sunday, February 6, 2011

Petit Fours Class

Petit Fours Class
at Central Market


For Christmas my mother-in-law signed me up for a Petit Fours class at Central Market taught by Laurie Mathers.  I had a great time learning how to make these little darlings!

Stats:
  • cream cheese pound cake (which she demonstrated making)
  • Swiss Meringue buttercream (which she demonstrated making)
  • lemon curd & raspberry jam
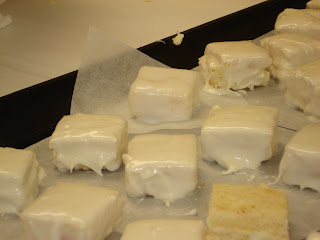
  • covered in candy coating (a.k.a. almond bark)

This class was very similar to my cake ball class that I took at Whole Foods, but by far better.  It was a full 2.5 hours, had more one-on-one time with the instructor, didn't feel rushed, and came with lunch!  The only down-side was that there were other cooks and assistants in the kitchen preparing meals for other parties at the same time.  It was a little distracting to say the least!

Another problem was not enough tools.  We sat in tables of 4, but only got 2 offset spatulas and 1 large knife, but 4 little steak knives.  I let my fellow decorators have the better tools for more time and did ok with just my butter knife and waiting for a turn. I would have liked to have more time to crumb-coat the sides, but I got them pretty straight to begin with by trimming them.


Having made cake balls really prepared me for dipping these things.  Laurie dislikes pouring the chocolate on the cakes over a rack because then they get stuck to the rack.  She demonstrated making poured fondant, but she likes the candy coating instead because it's easier and tastes better.  She let me dip one of mine in the fondant, and it was a little more difficult.


Yeah ... I was "that girl" in class.  The girl that has worked with royal icing before.  The girl that already knew how to pipe with the different tips.  The girl that knew the difference between Italian and Swiss meringue buttercream (the instructor couldn't remember which was which).  So yeah ... mine were the prettiest :b

I think I like making these more than cake balls ... or at least it's something different for a change.  I've decided to make some of these for my girlfriend's baby shower in March.  They are prettier to decorate.  I don't like candy coating as much as white chocolate though ... I'll probably do a 50/50 mix. 

Tuesday, February 1, 2011

Competition Work Log: Tiered Wedding Cake

Competition Work Log:
Tiered Wedding Cake
  • 1/31/11:  Finally got my last styrofoam dummy for Dallas Foam.  Sanded smooth most of its surface area.  Covered the tops of 6", 8", 10", and 12" rounds with a 50/50 fondant/modeling chocolate mix.  ~2.5 hours.
  • 2/01/11:  Covered the sides of the 6" and 10" with white modeling chocolate.  I had to re-do the 6" because I wasn't happy with the first pass.  This was my first time to roll out on to freezer paper and I must say it worked great!  Colored more modeling chocolate white.  Mixed black fondant with modeling chocolate (will be used for trim).  I'm now a bit unhappy with the green color.  It looks really green ... like ... golf course green.  I'm hoping my color scheme will all come together when I add the trim.  ~ 2 hours. 
  • 2/02/11:  Aren't I the busy beaver??  I covered the sides of the 8" round with modeling chocolate.  Before doing so, I applied my colored accent stripes to the rectangular piece of modeling chocolate (~4"x24").  I used my extruder to make narrow strips and glued them to my rectangle, then wrapped the cake with it.  Turned out awesome.  My only concern is that I only used a tiny bit of water to glue on the stripes ... hopefully it was enough to keep them on for good.  ~1 hr, 45 min.
  • 2/04/11:  I've been keeping my cakes in the den closet so the toddler, the husband, and the 3 cats won't mess with it.  Hubby and I were cleaning up the den area and he had to put something in the closet.  After placing the whatever it was, he said "Your cake has a crack in it."  My heart practically stopped.  Turns out he was referring the to seam on the side of my 8" round that I was planning on being the "back of the cake".  It was pretty good motivation for me to make some Royal Icing and patch up some of that gap where the ends met failed to meet cleanly.  Later on I covered the sides of the 12" round and let me tell you ... it's a lot harder to do any technique when you're working with 3 feet of continuous material.  I made a 4"x36" rectangular strip of modeling chocolate and put my accent stripes on it before attaching it to the dummy (this time using piping gel as adhesive).  It only had a minor tear getting it on, but easily rubbed away.  This is definitely the biggest cake I've ever worked on.  And tomorrow, I'm finishing it dammit!  I need to finish a cake a week to be in time for the show.  ~2.5 hours.
  • 2/05/11:  So I didn't finish the cake yet.  Hit a snag when my plan for my 2-tone damask design didn't work.  Hubby and I put our heads together and I mocked up a suitable solution, but didn't really have a lot of time to continue tonight.  Instead I put vertical stripes on my 8" and 12" tiers.  They look great!  Hopefully I can finish the cake tomorrow.  ~2 hours.
  • 2/06/11:  Superbowl family time prevented me from finishing this cake ... but I'm getting closer.  I put the damask designs on my 6" tier.  It looks ok ... not thrilled but I think the 10" damask designs will go better.  ~ 2 hours. 
  • 2/07/11:  ~whimper~ cake ... won't ... end ... Another couple hours cutting out and trimming the damask design for the 10" tier.  I'm fighting the urge to slap everything together and call it done.  I'm trying to decide if I want to coat the non-white portions of the cake with 50/50 corn syrup/alcohol to give it some shine.  Still not sure how I want to finish the borders.  ~ 2 hours. 
  • 2/08/11:  Ok.  Stacked all the tiers.  Put trim on the bottom of each tier.  Dusted it and tried to take off  excess powdered sugar by painting it with Everclear.  Stood back and looked at it.  Had Hubby stand back and look at it.  Decided the top tier ... the tier I did first ... looked like crap.  Had tons of finger marks, the cuts weren't straight, and we couldn't figure out how to fix it.  I took it off, threw it in the sink, and ripped off all of the decorations and coverings.  :(  I'll have to redo the this tier all over again.  ~3.5 hours.
  • 2/10/11:  FINISHED! It was a lot faster to re-do the top tier than I thought (probably because I knew exactly how to do everything).  It looks great.  I even decided not to put trim on the top of the tiers because it didn't need it.  A day or two before the competition I'll dust and shine it up.  ~2 hours.

As Seen On

As Seen On Capital Confectioners